
Artificial turf installation is the multi-layered process of preparing your ground, laying synthetic grass, and finishing with infill to create a durable, low-maintenance lawn that stays green year-round. Unlike rolling out carpet on bare soil, a proper synthetic grass installation is an engineered system built in distinct layers: compacted aggregate base, weed barrier fabric, the turf itself, and infill material. Each layer serves a specific structural or drainage function. Get any one of them wrong, and the whole system underperforms. This guide walks you through every phase of the artificial turf installation process so you can plan your project with confidence, whether you hire a professional or take it on yourself.
What are the essential steps of artificial turf installation?
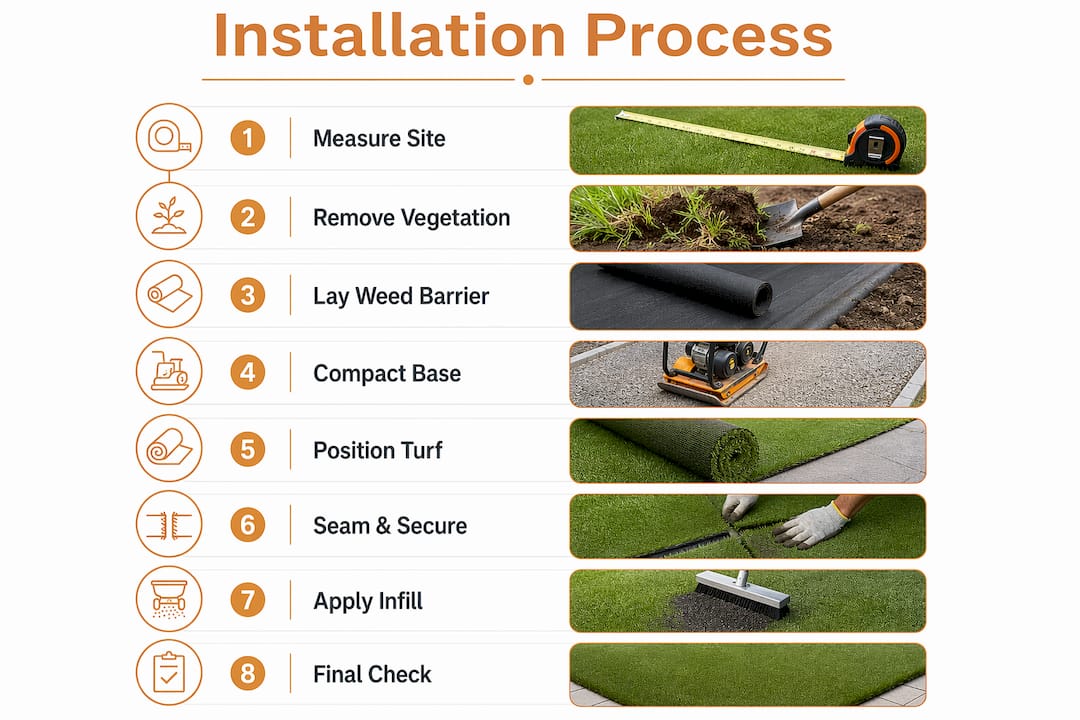
The artificial turf installation process follows a clear sequence. Rushing any phase creates problems that are expensive to fix after the turf is down.
Step 1: Site evaluation and measuring
Start by measuring your area accurately and sketching the layout. Note where water currently drains, identify any low spots, and check for underground utilities. Standard turf rolls are approximately 15 feet wide, so your measurements directly affect how many seams you will need and where they fall.
Step 2: Vegetation suppression and excavation
Apply a non-selective herbicide 3 to 5 days before your installation date to kill existing grass and roots. This step is skipped more often than any other, and it is the reason weeds push through finished turf months later. After suppression, excavate the area to a depth of 3 to 6 inches, removing all organic material, roots, and debris.
Step 3: Weed barrier and aggregate base
Lay a permeable weed barrier fabric across the excavated area, overlapping seams by at least 6 inches. Then add 2 to 4 inches of aggregate, typically crushed granite or decomposed granite, on top of the barrier. This layer is the structural foundation of your installation. It supports foot traffic, distributes load, and channels water away from the surface.
Step 4: Compaction and grading
Compact the aggregate base using a plate compactor or vibrating roller. Grade the surface with a 1 to 2 percent slope directed away from your home or any structures. That gentle grade is what moves rainwater off the turf and prevents pooling. Check for soft spots by walking the surface. Any area that gives underfoot needs additional compaction or fresh aggregate before you proceed.
Pro Tip: Use a long straightedge or laser level to verify your grade before laying turf. A 1-inch drop over 8 feet is roughly 1 percent. Catching an uneven base now saves you from lifting and relaying turf later.
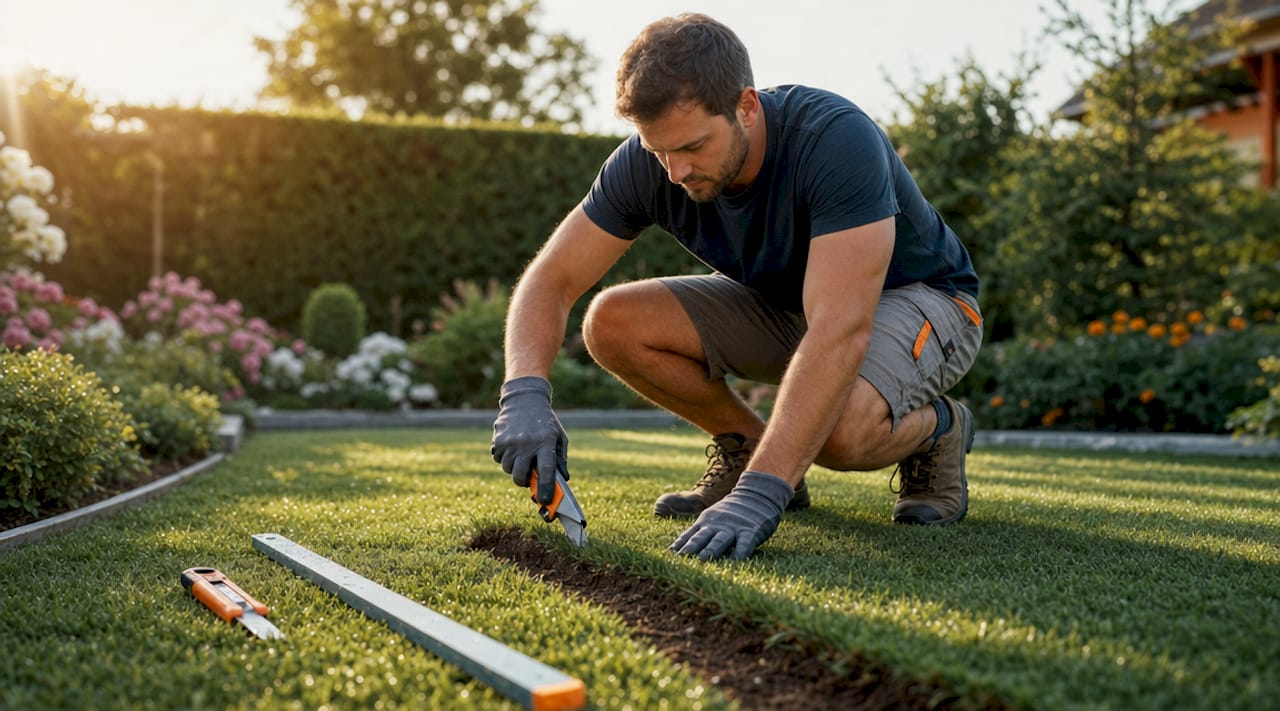
Step 5: Turf layout and cutting
Roll out your turf and let it acclimate for 1 to 2 hours in direct sun. This relaxes the backing and makes cutting cleaner. Position rolls so the blade direction runs the same way across all sections. Cut with a sharp utility knife along the backing, not through the fibers. Plan cuts so seams fall in low-traffic areas whenever possible.
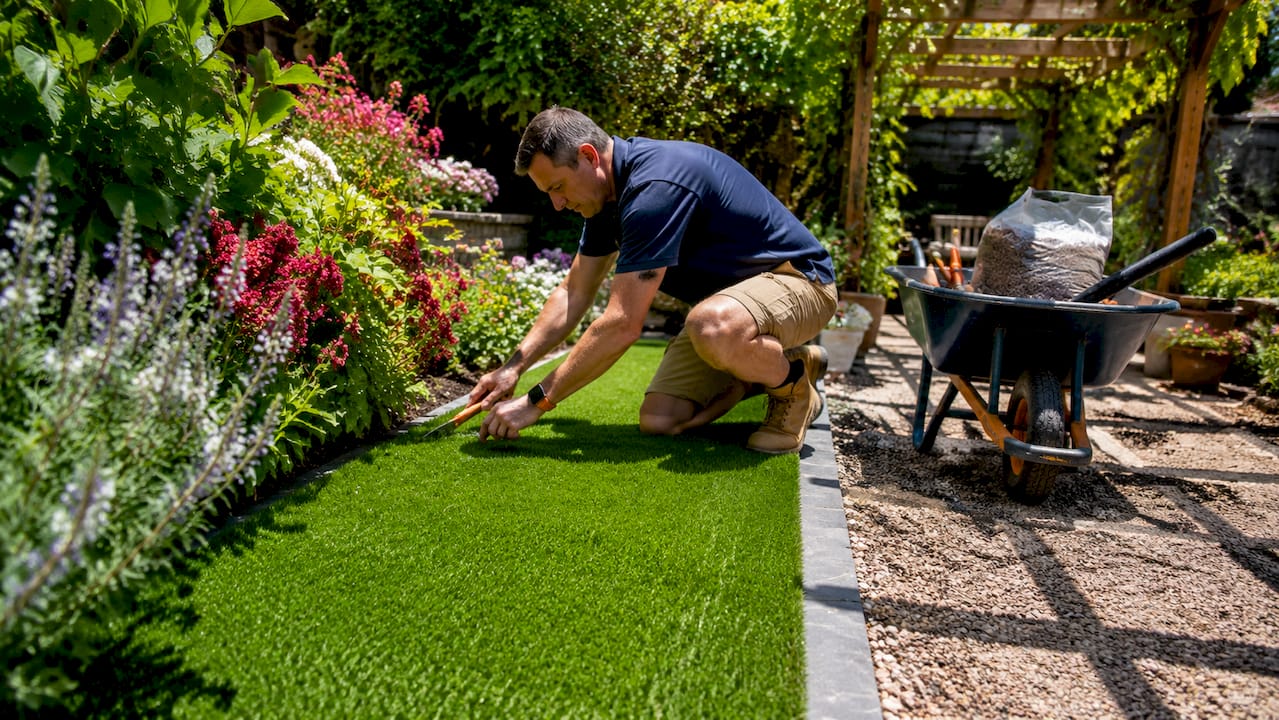
Step 6: Seaming and edge securing
Place seaming tape under each seam joint, apply turf adhesive to the tape, and press both turf edges down firmly. Leave a 1/8-inch gap at seams so the blades from each side can intermingle naturally. Secure the perimeter with galvanized nails or landscape anchors every 4 to 6 inches. Nails driven at a slight inward angle hold the edge tighter against the base.
Step 7: Infill application and power brushing
Spread infill material, typically silica sand, crumb rubber, or a hybrid product, evenly across the turf surface. A 100-pound bag covers roughly 60 square feet, though coverage varies by infill type and pile height. Use a drop spreader for even distribution, then power broom the entire surface to push infill down between the fibers and lift the blades upright.
Step 8: Final inspection
Walk every edge and seam. Press down any lifted corners, check that infill is consistent across the surface, and remove any adhesive residue from fiber tips. Residential projects typically take 2 to 5 days from start to finish, depending on area size and site conditions.
Why is base preparation the most critical part of the process?
Skipping or rushing base preparation is the most common reason turf systems fail early. The turf product itself is almost never the problem. The base underneath it is.
The aggregate base performs three jobs simultaneously: it supports the weight of foot traffic, it holds the turf flat without shifting, and it drains water efficiently. Artificial turf does not absorb water at all. Every drop of rain that falls on the surface must travel through the turf backing and drain through the base. A poorly compacted or improperly graded base traps that water, leading to pooling, odor, and turf that lifts or wrinkles over time.
Here are the base preparation practices that separate a lasting installation from a failing one:
- Compaction target: Reach approximately 90 percent compaction density using a mechanical plate compactor. Foot tamping is not sufficient. Multiple mechanical passes are required, and soft spots must be re-graded and recompacted before turf goes down.
- Organic material removal: Remove every root, stump, and piece of organic debris. Organic matter decomposes underground and creates voids that cause the surface to sink.
- Consistent slope: Grade the base to a 1 to 2 percent slope directed away from structures. This is non-negotiable for drainage performance.
- Soil type awareness: Clay soils drain poorly and may require a deeper aggregate layer or a French drain system beneath the base. Sandy soils compact more easily but may need a stabilizing binder mixed into the aggregate.
- Soft spot testing: After compaction, walk the entire base slowly. Any depression or soft give underfoot signals inadequate compaction. Address it before proceeding.
Pro Tip: For clay-heavy soil, consider adding a 1-inch layer of coarse sand directly beneath the aggregate to improve drainage capacity. This is a low-cost addition that significantly reduces pooling risk in wet climates.
| Base factor | What goes wrong without it |
|---|---|
| Mechanical compaction to ~90% | Surface sinks and wrinkles under foot traffic |
| Organic material removal | Decomposition creates voids and uneven surface |
| 1 to 2% drainage slope | Water pools on surface, causing odor and turf damage |
| Correct aggregate depth (2 to 4 inches) | Insufficient drainage and structural instability |
The crushed rock base is the single most important investment in any turf project. Spend the time here, and everything above it performs as designed.
What are the best practices for seaming, edge securing, and infill?
The finishing stages of synthetic grass installation determine how the turf looks and how long it holds up. Seams that fail are visible within weeks. Edges that lift become trip hazards. Uneven infill causes matted, flat-looking turf that ages poorly.
Seaming precision
Align turf edges so they meet cleanly with a 1/8-inch gap between them. Match the blade direction across both rolls before cutting. Mismatched grain direction is the most visible seam defect and cannot be fixed after adhesive sets. Apply adhesive only to the seaming tape, never to the turf fibers themselves. Adhesive on fibers bonds them together and creates a stiff, unnatural ridge along the seam line.
Edge securing
Drive galvanized nails or landscape anchors every 4 to 6 inches around the full perimeter. Use seaming tape and adhesive at all internal seams and at any border where turf meets a hard surface like concrete or pavers. Pull the turf taut before nailing to prevent buckling as the material expands and contracts with temperature changes.
Infill application
Power brooming before infill opens the fiber blades so infill can settle between them rather than sitting on top. After spreading, broom again to push infill down and lift blades into an upright position. This step directly affects how natural the turf looks and how well it cushions foot traffic.
Pro Tip: Apply infill in two passes rather than one. The first pass fills the base of the fibers. The second pass, done after a light brooming, fills the upper layer and creates a more even, natural-looking surface.
Common mistakes to avoid:
- Applying too much adhesive and contaminating fiber tips near seams
- Skipping the second power broom pass, which leaves fibers matted
- Using too little infill, which allows fibers to flatten permanently under foot traffic
- Nailing edges too far apart, which allows corners to lift in heat
DIY vs. professional artificial turf installation: what should you choose?
Both approaches can produce good results. The deciding factor is usually site complexity, available time, and your tolerance for physical labor.
| Factor | DIY installation | Professional installation |
|---|---|---|
| Upfront cost | Lower material cost only | Higher total cost including labor |
| Base prep quality | Depends on skill and equipment access | Consistent, mechanically compacted |
| Seam quality | Variable, steep learning curve | Precise, experienced technique |
| Timeline | 3 to 7 days for average yard | 2 to 5 days with a crew |
| Risk of rework | Higher without prior experience | Lower with warranty-backed work |
| Equipment needed | Plate compactor, power broom, utility knife | Provided by installer |
DIY installation works well for small, flat areas with straightforward shapes. A backyard putting green or a side yard strip under 200 square feet is a manageable first project. Larger areas, irregular shapes, slopes, or sites with drainage challenges benefit from professional expertise. Professionals bring turf installation knowledge that covers base engineering, seam planning, and drainage design in a single visit.
Before starting any installation, check your local council regulations and any homeowners association rules. Some jurisdictions restrict infill materials or require permits for ground excavation above a certain depth.
Key takeaways
Artificial turf installation succeeds or fails at the base layer. Every finishing step depends on a properly compacted, graded, and drained foundation beneath the turf.
| Point | Details |
|---|---|
| Base preparation is non-negotiable | Compact aggregate to ~90% density and grade to a 1 to 2% slope before laying any turf. |
| Vegetation suppression prevents future failures | Apply herbicide 3 to 5 days before installation to stop weeds from pushing through later. |
| Seam quality determines visual outcome | Match grain direction, leave a 1/8-inch gap, and keep adhesive off turf fibers at all seams. |
| Infill and power brooming are finishing essentials | Two-pass infill application with power brooming keeps fibers upright and the surface looking natural. |
| DIY suits simple sites; professionals handle complexity | Hire a professional for large areas, irregular shapes, or sites with drainage challenges. |
What I’ve learned from watching turf installations go wrong
I have watched homeowners spend good money on quality turf products and still end up with a lawn that looks tired within a year. Almost every time, the problem started underground. The base was rushed, the compaction was done by hand, or the slope was eyeballed instead of measured. The turf above it had no chance.
The part of this process that deserves the most respect is also the least visible. Nobody photographs their aggregate base. Nobody posts it on social media. But that compacted layer of crushed granite is doing the structural work that makes everything above it look and perform the way it should. Skipping it is like painting over a cracked wall. It looks fine for a season.
The other thing I would tell any homeowner approaching this project: do not underestimate the physical demand of base preparation. Renting a plate compactor is easy. Running it across 500 square feet of aggregate in summer heat is a full day of hard work. If your site is larger than a standard parking space, get quotes from professionals before committing to DIY. The labor cost often surprises people in a good way when they factor in equipment rental, material delivery, and the time they would spend doing it themselves.
Ongoing maintenance matters too. Power broom your turf two to four times per year to keep fibers upright and redistribute infill. Rinse pet areas weekly. Turf that is maintained properly lasts 15 to 20 years. Turf that is ignored starts looking flat and worn within three to five years.
— Vic
Get professional turf installation done right the first time
If this guide has shown you anything, it is that the quality of your finished lawn depends almost entirely on what happens before the turf rolls out. Base preparation, drainage grading, and seam precision are skills that take time to develop.

VW Concreting has completed over 145 outdoor projects across Melbourne, combining concreting and landscaping expertise to deliver turf installations that last. From precise base compaction to clean seams and proper infill application, the team handles every layer of the process. If you are ready to replace your lawn with a durable, low-maintenance synthetic surface, explore VW Concreting’s turf installation services and book a consultation today.
FAQ
What is artificial turf installation exactly?
Artificial turf installation is the process of preparing a site, building a compacted aggregate base, laying synthetic grass rolls, seaming them together, and applying infill to create a stable, low-maintenance lawn surface. It is an engineered multi-layer system, not simply placing grass-like material on bare ground.
How long does artificial turf installation take?
Most residential projects take 2 to 5 days from excavation to final brushing, depending on the size of the area and site conditions. Larger or more complex sites with drainage challenges may take longer.
What is the cost of artificial turf installation?
The cost varies based on area size, turf product quality, infill type, and whether you hire a professional or DIY. Material costs alone typically range from a few dollars to over ten dollars per square foot, with professional labor adding to the total.
Can I install artificial turf myself?
DIY installation is feasible for small, flat areas if you have access to a plate compactor and power broom. Larger areas, irregular shapes, and sites with drainage issues are better handled by professionals to avoid costly rework.
How do I maintain artificial turf after installation?
Power broom the surface two to four times per year to keep fibers upright and redistribute infill. Rinse pet areas weekly and remove debris regularly. Well-maintained synthetic turf can last 15 to 20 years.
Leave A Comment