
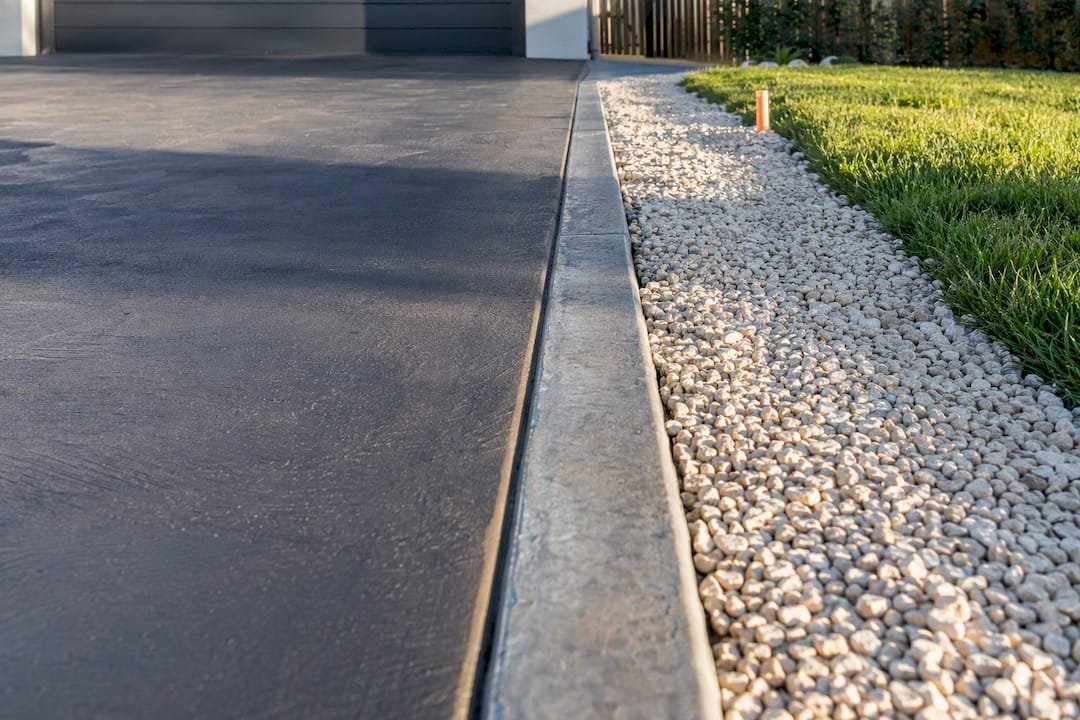
The best driveway edging matches three things at once: what your driveway surface is made of, how much weight rolls over it, and the look you’re after. Poured concrete curbs handle heavy vehicles and last decades. Stone or brick delivers permanence and resists frost heave. Metal and plastic restraints work well for gravel and budget projects. If you’re pouring new concrete or asphalt, lean toward concrete or masonry; if you’re containing loose gravel, a hidden steel or plastic restraint usually wins.
TL;DR:
- Proper base compaction and drainage planning are critical to prevent cracking and heaving in any driveway edging material.
- Steel and aluminum restraints are best for gravel drives, with flush steel often preferred for better water drainage and longevity.
- Reinforced concrete curbs withstand vehicle loads but require higher depth and quality base preparation to avoid early failure.
- Stone and brick edging are ideal for cold climates and long-term stability but demand mortared or dry-set installation depending on soil movement.
- Regular maintenance, including resealing concrete and checking stakes, is essential to extend the lifespan of driveway edging.
Table of Contents
- Why Driveway Edging Matters More Than It Looks
- Concrete Edging: Poured Curbs and Decorative Border Strips
- Stone and Brick Edging: Belgian Block and Traditional Brick Courses
- Metal Edging: Steel and Aluminum for Clean, Thin Lines
- Paver and Precast Edging: Inlay Borders and Soldier Courses
- Timber and Budget Edging: Landscape Timbers, Recycled Plastic, and Rubber
- Gravel Driveways Need Hidden Restraints, Not Curbs
- How to Install Driveway Edging: Step by Step
- Matching Edging to Your Driveway: A Quick Decision Checklist
- Driveway Edging Maintenance and Common Failure Points
- What VW Concreting Sees on Real Melbourne Driveways
- The Real Lesson Buried in Most Edging Advice
- Get Driveway Edging Done Right the First Time
- Sources
Why Driveway Edging Matters More Than It Looks
Edging isn’t decoration bolted onto a finished driveway. It’s the piece holding the whole system together. Without it, gravel migrates onto the lawn, asphalt edges ravel and crumble under tire pressure, and even concrete slabs can shift at unsupported margins.
A clean edge also does something less obvious: it frames the driveway the way a picture frame frames art, which is why realtors and appraisers often point to sharp borders as one of the cheaper curb-appeal upgrades a homeowner can make.
Edging interacts directly with drainage, too. A poorly placed curb can trap water against the base layer, softening it over a few seasons. That’s part of why proper drainage planning matters as much as the edging material itself.
What edging actually does:
- Contains loose materials like gravel and keeps asphalt edges from raveling under tire load
- Protects against vehicle overrun onto lawns, mulch beds, or soft shoulders
- Slows erosion along the driveway margin during heavy rain
- Adds a visible, deliberate border that boosts curb appeal
- Works with (or against) drainage and base compaction, depending on how it’s installed
Concrete Edging: Poured Curbs and Decorative Border Strips
Poured concrete is the workhorse choice for anyone parking cars, trucks, or trailers on a regular basis. A dedicated concrete curb, typically starting around 4 inches thick and 6 inches deep for residential work, resists lateral push far better than lighter materials, and hardscape guidance backs reinforced concrete banding specifically for vehicular driveways.
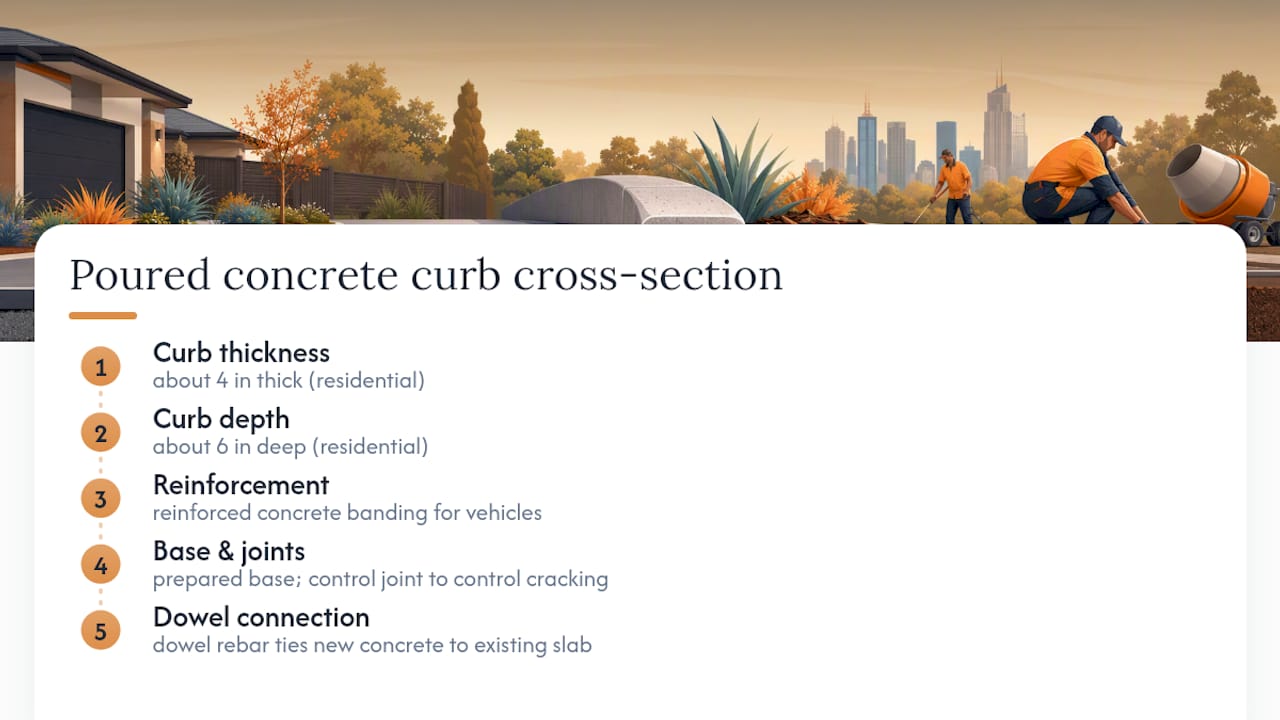
For a lighter touch, a poured border strip, stamped border, or exposed-aggregate band around an existing slab gives you a decorative edge without the cost of stamping the entire surface. Base prep, jointing to control cracking, and adequate cure time before vehicle traffic all matter here, and dowelling rebar ties where new concrete meets old prevents differential settling.
Pro Tip: If your driveway sees delivery trucks or a boat trailer, ask your contractor for a curb depth on the higher end of typical specs. Undersized curbs are one of the most common early-failure points on residential driveways.
Stone and Brick Edging: Belgian Block and Traditional Brick Courses
Granite Belgian block and clay brick sit at the premium end of driveway borders, and for good reason. They’re heavy, dense, and nearly immune to the kind of movement that cracks lighter materials.
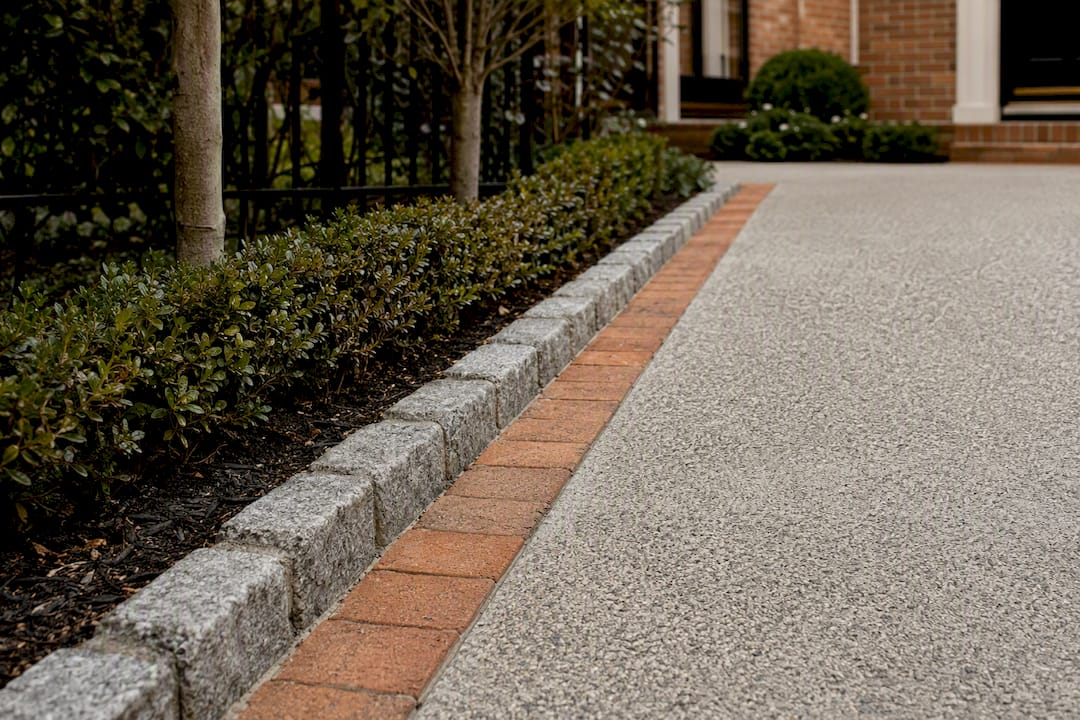
This Old House recommends setting stone or brick in concrete specifically for edges that need to survive freeze-thaw cycles, warning that thin plastic edging tends to get pushed out of the ground during winter heave. Brick laid in the “brick on edge” orientation gives a tighter, more formal line than flat-laid courses.
Where this material shines:
- Traditional or period homes where a formal border fits the architecture
- Cold climates where freeze-thaw cycling would displace lighter edging over a few winters
- Driveways near curbs that see snowplow contact, since mortared stone shrugs off blade strikes that would chip asphalt or crack thin concrete
- Long-term installs where you don’t want to revisit the edging again in a decade
Mortared installation is more permanent but less forgiving of ground movement; a compacted-base, dry-set installation trades some rigidity for easier future repairs.
Metal Edging: Steel and Aluminum for Clean, Thin Lines
Metal edging earns its place where you want a nearly invisible line, not a chunky curb. Galvanized steel handles heavier loads and holds a straight run better over long distances; aluminum bends more easily around curves and resists rust without a coating, though it flexes more under pressure.
Where metal edging works and doesn’t:
- Heavy-gauge steel with concrete backing where lateral loads are high, per hardscape edge-restraint guidance
- Anchor stakes spaced roughly 8 to 12 inches apart on flexible edging to stop lateral creep
- Gravel driveways and modern, minimalist landscape designs where a visible curb would look bulky
- Coastal properties, where standard steel corrodes faster and deicing salt exposure accelerates rust on both steel and untreated concrete edges alike
Skip thin aluminum where trucks or trailers regularly cross the edge. It bends, and once it bends, it stays bent.
Paver and Precast Edging: Inlay Borders and Soldier Courses
Pavers give you a decorative border that’s genuinely easy to fix later, which is the trade most homeowners underestimate until something cracks. Set as a soldier course inlaid during a concrete pour, or retrofitted along an existing slab edge, pavers create a visual break without the rigidity risk of a fully mortared border.
Masonry technical guidance notes that mortared joints can crack under movement where bedded (unmortared) units simply shift slightly and stay functional, which is why a dry-laid paver border tends to outlast a mortared one in areas with soil movement.
- Compatible with most home styles, from craftsman to contemporary, depending on pattern choice
- Easy to pull and reset individual units damaged by a mower or snowplow
- Best paired with a concrete finish that complements the paver color and texture
Timber and Budget Edging: Landscape Timbers, Recycled Plastic, and Rubber
Pressure-treated timber and cedar look great on day one but may deteriorate faster if the ground remains moist. Recycled plastic and rubber edging trade that rot risk for UV brittleness over time, but they cost the least of any option on this list and go in fast.
- Pressure-treated pine lasts longer than untreated cedar but still needs stakes driven deep enough to resist frost push
- Recycled plastic edging holds up well against moisture but can crack in extreme cold if it’s a thin, low-grade product
- Rubber edging flexes with ground movement and resists cracking, though color fades faster than most homeowners expect
- Best suited to gravel driveways, temporary installs, or rustic-look properties with light foot and vehicle traffic
Timber edging generally has a shorter lifespan and may need replacement after several years depending on soil moisture and quality of treatment. Budget materials aren’t a bad choice. They’re the right choice for a lot of situations, as long as you go in knowing the clock is running.
Gravel Driveways Need Hidden Restraints, Not Curbs
Gravel behaves differently than concrete or asphalt, and it needs a different containment strategy. A rigid curb can actually work against a gravel drive by trapping water at the base; a flush steel or plastic restraint lets water drain through while still holding the aggregate in its lane.
Gravel-specific edging guidance recommends steel or aluminum for long straight runs and reserves timber or plastic for shorter, lower-budget stretches.
- Flush restraints sit at or near grade, which keeps mowers and plow blades from catching an edge
- Anchor stakes need to reach below the frost line in cold climates to actually hold position
- Base compaction matters more here than the edging material itself. A poorly compacted gravel base will shift and spill over even the best restraint
How to Install Driveway Edging: Step by Step
Installation difficulty ranges from a Saturday-afternoon DIY job (plastic or timber edging) to a multi-day project that genuinely needs a contractor (poured concrete curbs, mortared stone). Here’s the general sequence, with material-specific notes built in.
- Mark the layout. Use stakes and string to establish a straight or intentionally curved line before you dig anything.
- Trench to depth. Depth depends on material. Plan for roughly 4 to 6 inches for flexible restraints and closer to 6 to 8 inches for concrete curbs that need a gravel sub-base.
- Compact the base. Skipping this step is the single most common reason edging fails within the first year or two, regardless of material.
- Set anchors or forms. Flexible edging gets stakes every 8 to 12 inches; concrete needs formwork and, where it meets an existing slab, dowels or rebar ties.
- Place the material. Pour and screed concrete, mortar stone or brick, or snap in metal and plastic restraints.
- Address drainage as you go, not after the fact. Grade the edging line to shed water away from the base rather than trapping it.
- Cure or cure-check before use. Concrete generally needs 24 to 48 hours before foot traffic and closer to 5 to 7 days before vehicles, depending on mix and weather.
Pro Tip: Never set lightweight plastic edging directly against fresh or existing asphalt. As the asphalt softens in heat and shifts under tires, it can deform and push thin plastic right out of the ground. Metal or concrete holds the line better at that interface.
Frost-prone regions, heavy vehicle loads, or unstable or expansive soils are the three conditions where DIY installation stops making sense. A geotechnical note or an engineer’s spec on base depth is cheap insurance compared to redoing a curb that heaves out of the ground two winters later.
Matching Edging to Your Driveway: A Quick Decision Checklist
Before you pick a material, run through five questions: What’s the driveway surface (concrete, asphalt, pavers, gravel)? How heavy and how frequent is the vehicle traffic? What’s the aesthetic goal? What’s the budget per linear foot? And realistically, what’s your own DIY skill level?
A few quick matches make this concrete:
- If you’re parking a truck or trailer regularly, go with poured concrete curbing, not timber or plastic.
- If you want a formal look with real permanence, stone or brick set in concrete outperforms every budget option in cold climates.
- If you’re containing a gravel drive and want it nearly invisible, a flush steel or aluminum restraint beats a raised curb.
- If cost is the main constraint and traffic is light, recycled plastic or timber gets the job done for several years.
- If you’re adding a decorative touch to an existing slab, a stamped or paver border strip costs a fraction of redoing the whole surface, a point cost breakdowns on border styles confirm directly.
When soil conditions are questionable, frost heave is a known issue in your area, or the driveway will carry commercial-weight vehicles, bring in a contractor. Ask them about base depth, reinforcement specs, and how the new edging ties into existing drainage. Vague answers to any of those three questions are a red flag.
Driveway Edging Maintenance and Common Failure Points
Most edging problems trace back to one of two causes: a base that was never compacted properly, or water that’s been sitting against the material for longer than it should. Weeds pushing through joints, crumbling mortar, and heaved sections are symptoms, not the root problem.
A basic seasonal routine catches most of this early:
- Check anchor stakes and restraint clips each spring for movement or rust
- Reseal concrete borders every 2 to 3 years, more often in salted, snow-heavy climates
- Regrade gravel or soil that’s built up against edging and blocking drainage
- Pull and reset individual pavers or stones as soon as one shifts, rather than waiting for the whole run to go
- Watch for gaps that let deicing salt sit against concrete or metal edging over winter
Salt exposure deserves particular attention. University of Minnesota Extension research on deicing salt damage to landscapes and hardscapes shows salt accelerates corrosion in metal edging and speeds up surface scaling in unsealed concrete, which is a maintenance cost a lot of homeowners don’t budget for until it shows up.
If an entire section of edging is heaving uniformly rather than cracking in one spot, that’s usually a base or frost problem, not a material defect. Spot cracking or localized crumbling is more often a superficial fix.
What VW Concreting Sees on Real Melbourne Driveways
After more than 145 completed projects across Melbourne, a pattern shows up again and again: edging failures almost always trace back to the base, not the material on top of it. A beautiful stamped border poured over an under-compacted sub-base will crack within a year or two no matter how good the finish looks on day one.
A few things worth asking any contractor bidding your job:
- What’s the actual base depth and compaction standard for this specific edging type?
- Is fiber or steel reinforcement included in the concrete mix, and where?
- How are control joints placed relative to the edging line?
- What’s the warranty period, and does it cover heave or cracking specifically?
- How does the edging tie into existing drainage on the property?
Vague or one-word answers to those questions usually mean the base prep is getting rushed to save time on the job.
The Real Lesson Buried in Most Edging Advice
Most driveway edging content ranks materials by looks first and durability second. That’s backward. The material you pick matters less than whether the person installing it respects the base and the drainage path underneath it, and that’s the piece almost every glossy edging roundup skips entirely.
Here’s the uncomfortable truth: a mid-grade material installed with proper compaction and correct anchor depth will outlast a premium material set on a rushed base. I’ve seen enough failed Belgian block borders, cracked stamped concrete, and heaved plastic restraints to know the pattern repeats regardless of price point.
If you take one thing from this guide, prioritize base prep and drainage integration over the material’s brand or finish. Ask your contractor about compaction standards before you ask about color options. The edging that looks best in five years is rarely the one that looked flashiest on installation day. It’s the one where nobody cut a corner underneath it.
— Vic
Get Driveway Edging Done Right the First Time
VW Concreting offers professional driveway edging services that help avoid common installation mistakes. Since 2001, VW Concreting has completed more than 145 concreting and outdoor construction projects across Melbourne, and the edging failures covered above (bad base prep, skipped reinforcement, poor drainage ties) are exactly what a properly scoped job avoids from day one.

Whether you’re pouring a new driveway with an integrated concrete curb, adding a stamped border to an existing slab, or need exposed aggregate edging that matches your home’s style, the same base standards apply every time: proper compaction, correct depth, and drainage that actually works with the edging instead of against it.
Check out driveway and slab installation options to see the kind of work behind these recommendations, and reach out for a quote on your next driveway or edging project.
Sources
- How To Install Belgian Block Driveway Edging – This Old House
- Types of Edge Restraints and Borders for Texas Hardscapes – Cultivating Flora
- Driveway Border Ideas: 5 Styles and What They Cost
Leave A Comment