
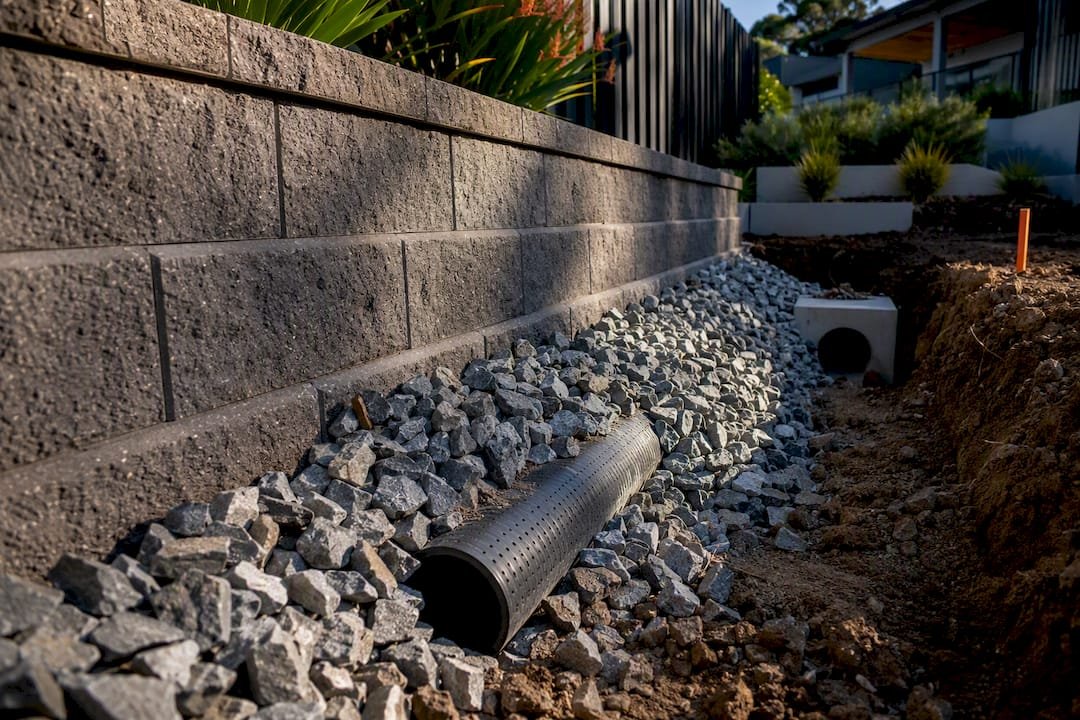
The reliable, long-lasting fix for most retaining walls is a 12-inch clean stone envelope wrapped in non-woven geotextile, with a 4-inch perforated pipe (holes down) sloped at 1 to 2% toward a daylighted outlet, backed by surface grading that sheds water away from the wall. Retrofits belong on failing or undrained walls, especially where you see bulging, staining, or standing water. Bring in an engineer for walls over 4 feet, active soil movement, or a high water table. Soil type and wall height still change the exact recipe.
TL;DR:
- Proper drainage systems use a 12-inch drain stone, a 4-inch perforated pipe with holes facing down, wrapped in geotextile fabric to prevent clogging.
- Sloped surface grading and addressing surface runoff are essential to prevent overwhelming the drainage system during heavy rains.
- Retrofits should start with assessing stability and may involve drilling weep holes, installing base trenches, or adding chimney drains for active water migration.
- In clay soils or high groundwater conditions, wider stone columns, additional drain lines, or more permeable backfill are necessary to prevent saturation failure.
- Regular inspections after storms and with simple tests help identify clogging or slope issues early, avoiding costly full rebuilds or structural failures.
Table of Contents
- Why Retaining Wall Drainage Solutions Prevent Hydrostatic Pressure and Wall Failure
- Core Components of an Effective Retaining Wall Drainage System
- How Do You Install Drainage for a New Retaining Wall?
- How Do You Retrofit Drainage on an Existing Retaining Wall?
- Adjusting Retaining Wall Drainage for Soil, Slope, and Frost
- What Causes Most Retaining Wall Drainage Failures?
- Retaining Wall Drainage Maintenance and Inspection Checklist
- Retaining Wall Drainage Materials and Sizing Quick Reference
- What Contractors Know About Retaining Wall Drainage That Homeowners Don’t
- When Should You DIY Retaining Wall Drainage and When Should You Hire a Pro?
- How VW Concreting Approaches Retaining Wall Water Management
- Sources
Why Retaining Wall Drainage Solutions Prevent Hydrostatic Pressure and Wall Failure
Water, not soil, is the primary enemy of a retaining wall. When rain or irrigation soaks into the backfill and has nowhere to go, it saturates the soil directly behind the wall and builds hydrostatic pressure against the structure. That pressure pushes outward constantly, whether the wall is holding back three feet of garden bed or eight feet of hillside.
Soil is heavy enough on its own. Saturated soil is far heavier, and it also loses much of the internal friction that normally helps it stay put. A wall engineered to resist dry soil pressure can crack, bow, or tip outright once that same soil turns to mud behind it. This is the single biggest reason retaining walls fail years after installation, long after the original construction looked solid.
Effective drainage systems solve this by giving water a faster path out than through the wall face or over the top. Instead of pressing against the wall, water drops through a permeable stone channel, collects in a pipe at the base, and exits somewhere harmless. A complete retaining wall drainage system built this way removes the hydrostatic load before it ever becomes a structural problem, which is why proper retaining wall water management matters more than the thickness of the wall itself in most residential failures.
Frost adds another layer. In climates with freeze-thaw cycles, water trapped in saturated soil expands as it freezes, and that expansion shoves against the wall with additional force each winter. A wall with poor drainage doesn’t just fail slowly from water weight. It fails faster where freeze-thaw cycling repeats the stress season after season.
Core Components of an Effective Retaining Wall Drainage System
Every drainage solution for landscaping project that actually holds up long term uses the same four building blocks. Skip one, and the whole system underperforms no matter how well the others are built.
- Drain stone: Use #57 washed, crushed angular stone, not rounded pea gravel, in a column at least 12 inches wide directly behind the wall face. Designers recommend that 12-inch minimum because narrower zones clog faster and give water less room to move vertically before it reaches the base pipe.
- Perforated drain pipe: A 4-inch perforated PVC or corrugated HDPE pipe, installed with the holes facing down, running at a 1 to 2% slope toward the outlet. Family Handyman’s installation guidance treats this pipe size and slope as standard for most residential walls above 3 to 4 feet.
- Geotextile filter fabric: Wrap the stone and pipe in non-woven geotextile, never woven landscape fabric, to keep fine silt from migrating into the stone and clogging the drainage path over time.
- Weep holes: Small openings through the wall face, spaced to provide secondary relief if the base drain becomes overwhelmed during a heavy storm.
- Surface drainage: Grading the soil surface to slope away from the wall, along with swales and downspout routing, keeps roof and lawn runoff from ever reaching the buried system in the first place.
That last point gets overlooked constantly. Homeowners obsess over the buried pipe and forget that a downspout dumping straight onto the backfill can overwhelm even a well-built drainage system during a single hard rain. Fixing the grading around a wall is often cheaper and faster than any excavation work, and it reduces the volume the buried system has to handle.
The holes-down orientation on the pipe matters more than most people realize. Water enters through the bottom perforations after percolating down through the stone, and holes facing up tend to silt in faster and collect standing water instead of moving it along. It’s a small installation detail with an outsized effect on how long the system keeps working.
How Do You Install Drainage for a New Retaining Wall?
Building the drainage system alongside a new wall, rather than retrofitting it later, is always the cheaper and more reliable path. Here’s the sequence that produces a durable result.
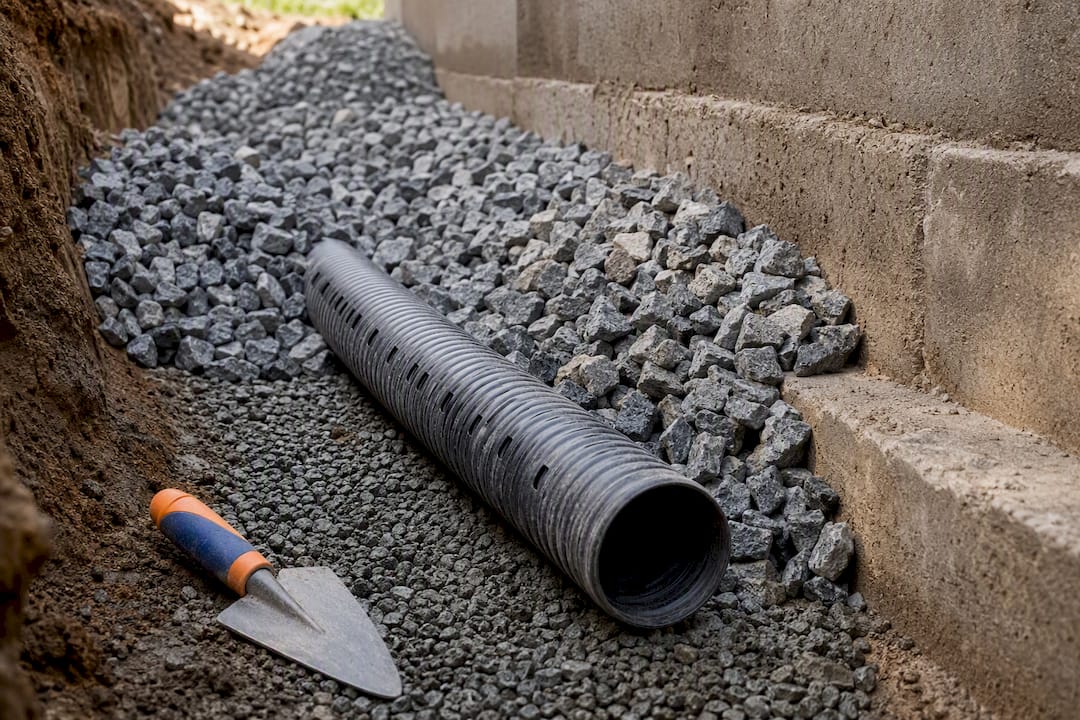
- Excavate the drainage zone. Dig a trench along the back of the wall footprint at least 12 inches wide and deep enough to sit the pipe below the base of the wall, extending the full length of the structure.
- Prepare the base. Compact a leveling pad of crushed stone at the bottom of the trench so the pipe sits on a stable, slightly sloped bed rather than loose or uneven soil.
- Set the pipe with slope. Lay the 4-inch perforated pipe holes down, checking the fall with a level or line level to confirm a consistent 1 to 2% grade running continuously toward the outlet. Even a short flat or backward-sloped section creates a low point where sediment collects and water stalls.
- Wrap and place stone. Line the trench with non-woven geotextile before adding stone, fold the fabric up the back of the wall, then backfill with #57 stone around and above the pipe to build the full drainage column.
- Close the fabric envelope. Fold the geotextile over the top of the stone column before adding the remaining soil backfill, fully separating soil from stone at every surface.
- Backfill above the drainage zone. Fill the remaining trench with native soil or a more permeable backfill blend, compacting in shallow lifts so the wall isn’t shocked by a single heavy load.
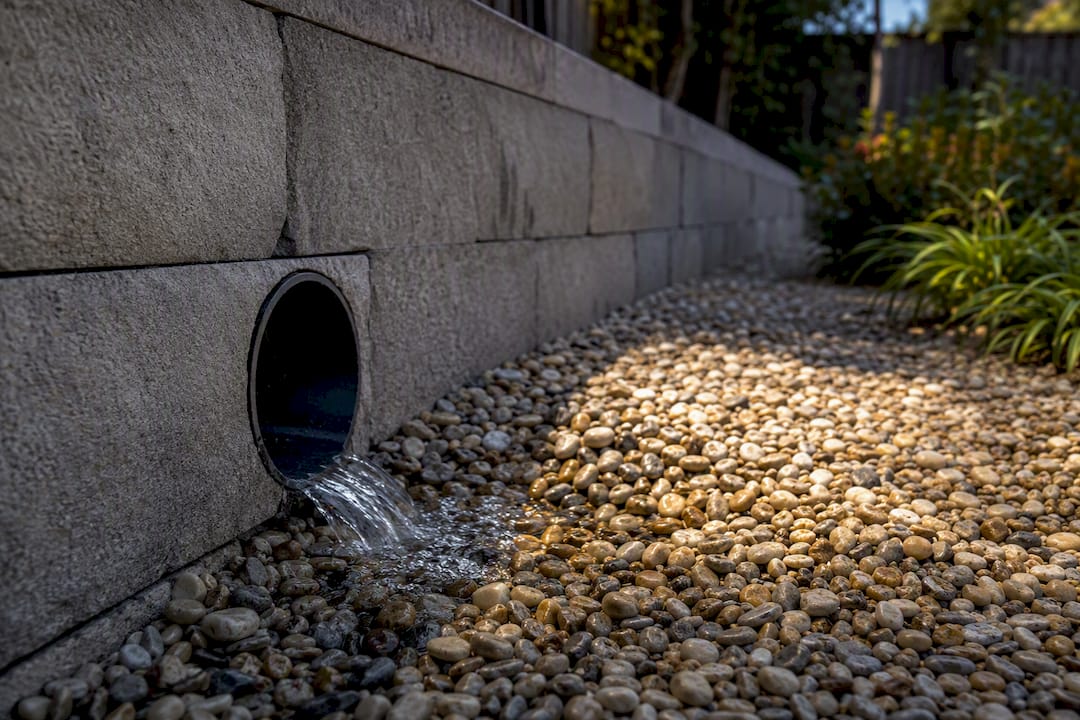
- Connect the outlet. Run the pipe to daylight at a lower point on the property, into a dry well, or tie it into an approved storm connection. Cap the exposed end with a rodent guard or gravel splash pad so it doesn’t clog with leaves or become a nesting spot.
Pro Tip: Before you backfill the last few inches, run a hose into the drainage zone and time how fast water appears at the outlet. If it takes more than a few minutes or doesn’t show up at all, you have a slope or blockage problem while it’s still easy to fix.
The outlet is the piece people most often shortchange, and it’s the one field guidance flags most directly: a pipe that dead-ends without daylighting or tying into storm infrastructure will back up and defeat the entire system, no matter how well the stone and fabric were installed upstream.
How Do You Retrofit Drainage on an Existing Retaining Wall?
Retrofitting is harder than building drainage in from the start, but plenty of walls showing early trouble can still be saved without a full rebuild. Start with an honest look at the wall before deciding how invasive to go.
- Assess stability first. Check for bulging, leaning, stair-step cracking, or soil separating from the top of the wall. Any of these suggest active movement, and that changes the retrofit plan entirely.
- Drill weep holes for quick relief. Boring small drainage holes through the wall face at the base gives trapped water somewhere to go, but drilling weep holes alone often isn’t enough for walls taller than about 5 feet, since they only relieve water that’s already pooled against the wall rather than managing it proactively.
- Excavate a toe trench for a base drain. Working in short sections rather than one continuous cut lets you install a proper perforated pipe and stone system at the base without pulling support from under the wall all at once.
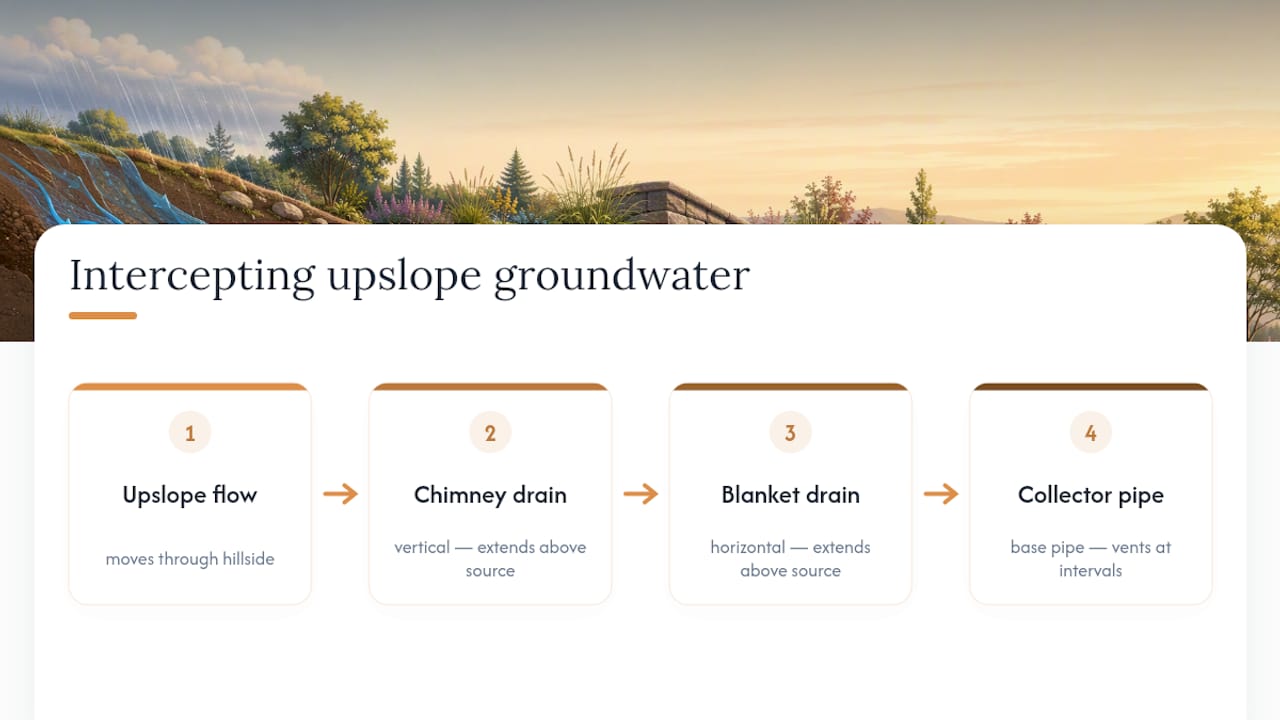
- Add a relief or chimney trench for groundwater. Where subsurface water is migrating through the slope rather than just collecting from surface rain, a vertical chimney drain tied into the base pipe intercepts it before it ever reaches the wall.
- Weigh cost against risk. Drilling weep holes is a weekend project. A staged toe trench is a multi-day job that may need shoring. A full excavation and rebuild is a contractor-level undertaking, and it’s worth getting a quote before committing to DIY on a wall that’s already showing distress.
Whatever you choose, protect the base of the wall with temporary measures, like covering exposed soil with plastic sheeting during wet weather, while the retrofit work is staged. A partially completed drainage fix is better than none, but an unprotected trench during a storm can undo a weekend’s work overnight.
Adjusting Retaining Wall Drainage for Soil, Slope, and Frost
No two sites drain the same way, and the standard specs need real adjustment depending on what’s actually behind the wall.
Clay and poor-draining soils hold water far longer than sandy or loamy backfill, which means a standard drainage zone can still saturate the surrounding clay even while the pipe itself runs clear. Engineers commonly recommend “drainage overkill” in these conditions: widening the stone column beyond the 12-inch minimum, adding a second parallel drain line, or swapping a portion of the native clay backfill for a more permeable material. The extra material costs more upfront but avoids a far more expensive failure down the line.
Migrating groundwater on sloped sites needs more than a base drain. When water is moving through the hillside itself rather than just falling as rain, chimney and blanket drains intercept that flow before it builds pressure against the wall. These vertical and horizontal drain layers should extend up to a height above the known water source, and pipe venting at regular intervals along long collector runs prevents air locks that can stall flow partway through the system.
Upslope surface water is worth managing before it ever reaches the wall. A cut-off drain or swale positioned above the retained area, combined with sensible irrigation scheduling that avoids soaking the slope right above a wall, reduces the load your buried system has to carry.
Frost and freeze-thaw climates call for protecting the outlet from ice blockage and choosing pipe and fabric rated for below-grade freeze conditions, since a frozen outlet during a spring thaw is exactly when the system needs to work hardest.
What Causes Most Retaining Wall Drainage Failures?
Most drainage failures trace back to one of five preventable mistakes, and recognizing them early is the difference between a quick fix and a rebuild.
- No outlet, or a buried one. A pipe that dead-ends underground instead of daylighting will back up completely.
- Wrong stone. Rounded pea gravel or undersized aggregate compacts and clogs far faster than angular #57 stone.
- Skipped filter fabric. Bare stone against native soil silts in within a few seasons, choking the drainage path from the outside in.
- Flat or reverse-sloped pipe. Even a short section without the proper 1 to 2% fall creates a standing-water pocket that sediment settles into.
- Surface water ignored. Downspouts and poor grading dumping water straight onto the backfill overwhelm a buried system that was never designed to handle direct runoff.
Visual warning signs tell you which failure mode you’re dealing with. Efflorescence or dark staining on the wall face points to water finding its own path through the structure. Bulging or leaning indicates pressure has already built past what the wall was designed to resist. Standing water at the base after rain, rather than a slow trickle from a weep hole, usually means the outlet or stone column has clogged.
A simple hose test, pouring water into the drainage zone near the top and timing how fast it appears at the outlet, is the fastest diagnostic homeowners can run without digging. Probing weep holes with a thin rod checks whether they’re actively clogged. If the wall shows active leaning or cracking rather than just moisture issues, stop troubleshooting and call a structural engineer. Short-term fixes like clearing a weep hole buy time; they don’t substitute for a proper base drain on a wall that never had one.
Retaining Wall Drainage Maintenance and Inspection Checklist
Drainage systems don’t need constant attention, but they do need to be checked on a schedule rather than only after something goes wrong.
- Inspect twice a year, ideally in early spring and late fall, walking the full length of the wall to check for new cracking, bulging, or staining.
- Check after major storms. Heavy rain events are when a marginal drainage system reveals itself, so look for standing water or slow drainage within a day or two of a big storm.
- Clear weep holes and outlets of leaves, mulch, and dirt that accumulate over a season, using a thin rod or gentle water flush rather than forcing anything that might damage the pipe.
- Watch for signs digging is needed, such as recurring wet patches at the base or a weep hole that stays dry even during heavy rain, which suggests a clog further back in the stone or pipe.
- Keep a simple record of inspection dates and any repairs, so a pattern of recurring issues is obvious rather than something you have to reconstruct from memory years later.
Pro Tip: Snap a photo of the wall base each time you inspect it. Comparing images side by side over a year makes subtle changes, like a slowly widening crack, far easier to catch than relying on memory alone.
Retaining Wall Drainage Materials and Sizing Quick Reference
Keep these numbers on hand when you’re buying materials or reviewing a contractor’s bid, since vague specs in a quote are often where corners get cut.
- Drain stone: #57 washed, crushed angular stone (roughly 3/4 inch), minimum 12 inches wide behind the wall; go wider for walls over 4 feet or in clay soils.
- Drain pipe: 4-inch perforated PVC or corrugated HDPE, holes down, sloped 1 to 2% to the outlet; a filter sock around the pipe is optional but helps in silty soils.
- Weep holes: Space according to wall height as a secondary relief measure, sized a few inches in diameter, and never relied on as the primary drainage path.
- Filter fabric: Non-woven geotextile only, with a minimum 6 to 12-inch overlap at every seam and fold to fully enclose the stone column.
What Contractors Know About Retaining Wall Drainage That Homeowners Don’t
Every retaining wall project starts with the same question: where does the water actually go once it’s collected? A drainage plan that looks correct on paper but has no clear daylight point or storm connection is the most common gap found during site inspections.
Common site constraints include tight side setbacks that limit trench width, existing landscaping that complicates outlet routing, and clay-heavy soils typical of many Melbourne suburbs that demand the wider drainage zones described earlier. A proper warranty on retaining wall work should cover the drainage components specifically, not just the visible wall face, since drainage failure is what causes most structural claims.
When Should You DIY Retaining Wall Drainage and When Should You Hire a Pro?
Drilling a few weep holes or improving surface grading is reasonable weekend work for most homeowners. Once you’re dealing with a wall over 4 feet, any sign of active movement, or a high water table, bring in a professional. Those conditions carry real risk of injury or structural collapse during excavation.
A competent bid should spell out the drainage detail explicitly: stone type and width, pipe size and slope, outlet protection, and what the warranty actually covers. When vetting local contractors, ask how they’ve handled clay soils or high groundwater on past jobs. Vague answers there are a red flag.
— Vic
How VW Concreting Approaches Retaining Wall Water Management
If your wall is already showing bulging, staining, or standing water at the base, a proper fix usually means more than a weekend of drilling weep holes. Builders of retaining walls and drainage systems have experience with many completed projects, and every one starts with the same site assessment: soil type, slope, and where the water needs to go before the wall goes in.

That experience matters most on the details that don’t show up in a quick online quote, like whether your clay-heavy soil needs a wider drainage column or whether an existing wall needs a staged toe trench instead of a full rebuild. Com’s retaining wall construction service covers both new installations and drainage retrofits for failing walls, built to the same stone, pipe, and fabric specifications outlined above.
If your wall shows any of the warning signs covered in this guide, request an on-site inspection and quote from Com before the problem gets more expensive to fix.
Sources
The technical specifications in this guide draw on established installation and engineering guidance, useful for readers who want to go deeper on any one component.
- How to Add Retaining Wall Drainage for Long-Lasting Stability (Family Handyman)
- Retaining Wall Drainage: Prevent 80% of Wall Failures (BuildCalcHub)
- Proper water management guidance and chimney/blanket drain recommendations (Allan Block technical note)
- Retaining wall drainage: weep holes, drain pipes, and installation steps (Build-Construct)
Leave A Comment