
A brushed concrete finish driveway step is defined as a textured surface created by dragging a stiff-bristled broom across freshly poured concrete before it fully sets. This technique is the industry’s standard method for outdoor steps, and it delivers up to 50% more slip resistance than a smooth surface. The result is a finish that handles foot traffic, wet weather, and vehicle overhang with equal confidence. This guide covers every stage of a brushed concrete finish driveway steps project, from sub-base preparation through long-term maintenance, so you can plan and execute with clarity.
What materials and prep do brushed concrete driveway steps need?
Strong steps start below ground. A heavily compacted MOT Type 1 sub-base is the single most important factor in the long-term performance of any concrete step or driveway. Without it, even a perfectly finished surface will crack and settle within a few seasons. Think of sub-base compaction as the silent guardian of your entire project.
For the concrete mix itself, air-entrained concrete is the right choice for outdoor steps in variable climates. Air entrainment creates microscopic bubbles inside the mix that absorb the pressure of freeze-thaw cycles. This prevents internal cracking that would otherwise destroy the surface from the inside out over winter.
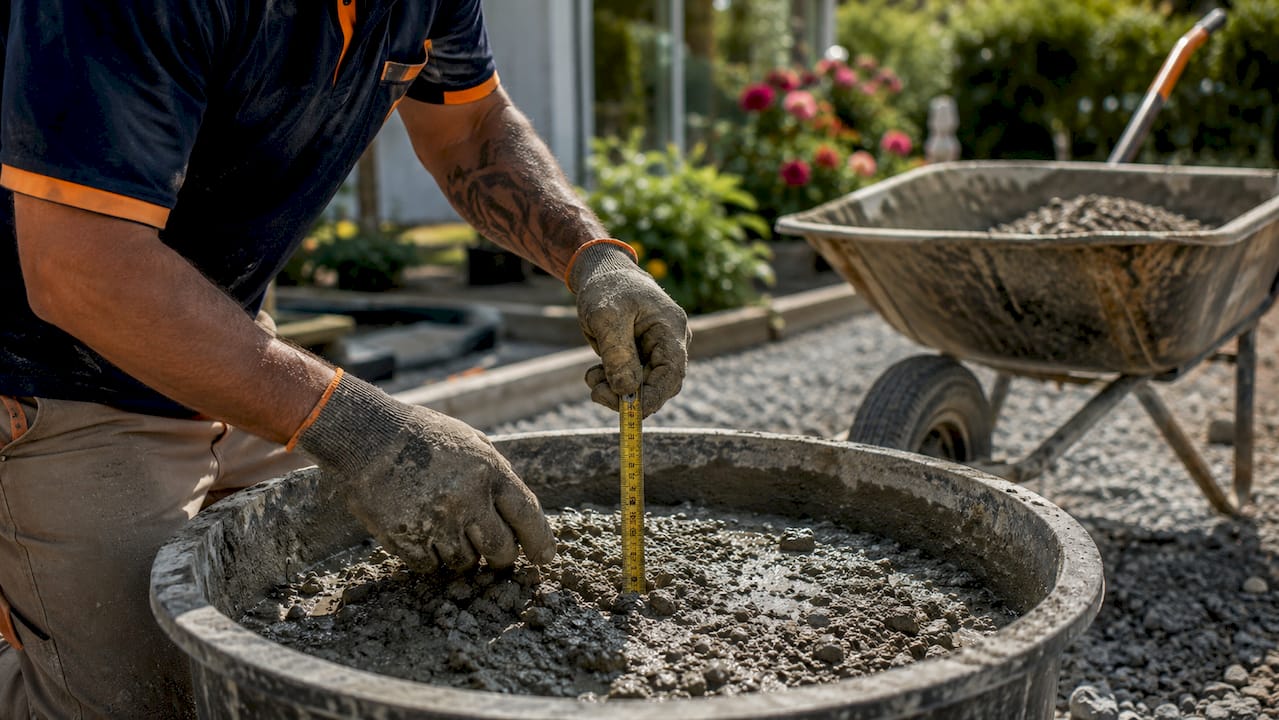
Dimensional accuracy matters just as much as mix design. Industry standards specify a riser height of 6–7.75 inches, a minimum tread depth of 11 inches, and a tread thickness of 3.5–4 inches. These numbers exist for safety and code compliance. Deviating from them creates tripping hazards and weakens the structural integrity of each step.
Before you pour a single yard of concrete, gather every tool and material on this list:
| Item | Purpose |
|---|---|
| MOT Type 1 sub-base material | Stable, compacted foundation layer |
| Plate compactor | Achieves required sub-base density |
| Air-entrained concrete mix | Freeze-thaw resistant structural fill |
| Timber or steel formwork | Shapes risers and treads to spec |
| Concrete broom (stiff bristle) | Creates the brushed texture on treads |
| Nosing edger tool | Rounds tread edges to prevent chipping |
| Bull float or darby | Levels the surface before finishing |
| Curing compound or plastic sheeting | Retains moisture during the cure period |
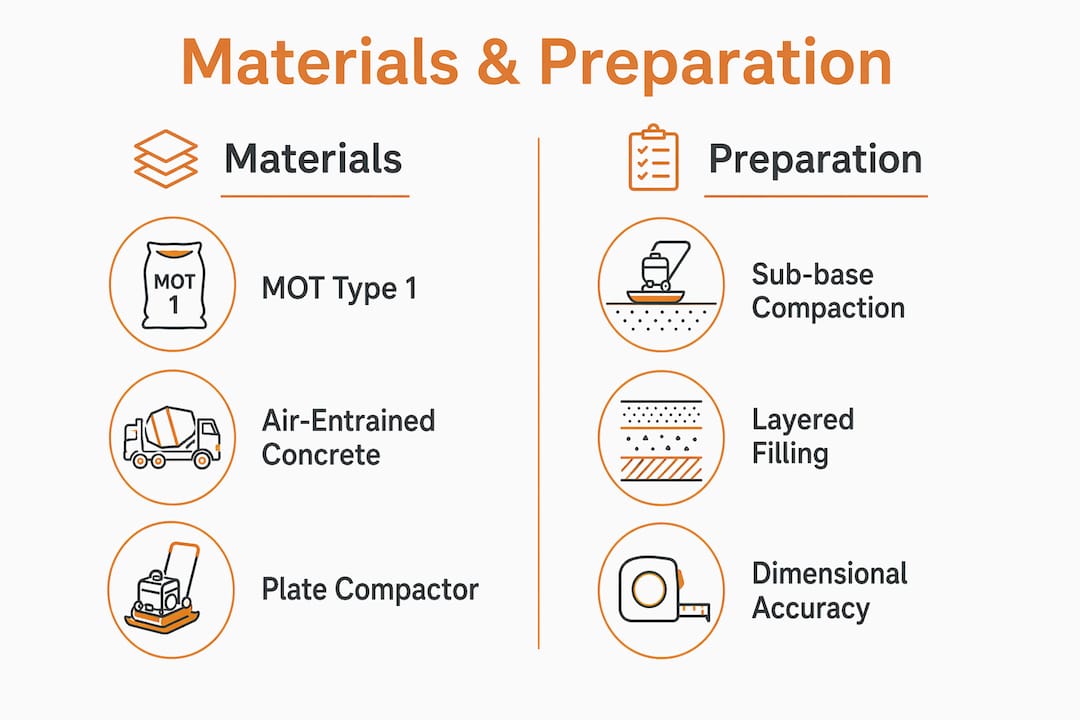
Pro Tip: Compact your sub-base in layers no thicker than 4 inches. Running a plate compactor over a single deep layer leaves the bottom loose, which is the most common cause of step settlement that homeowners never trace back to the real source.
How do you pour and achieve the perfect brushed finish?
The pour and finish sequence is where most DIY projects go wrong. Follow these steps in order, and you will avoid the most common failures.
-
Build your forms with a 5-degree backward lean on the risers. Professional form builders use this lean to improve concrete compaction at the tread-riser junction and to make finishing easier. A perfectly vertical riser traps air and creates voids at the base of each tread.
-
Pour from the bottom step up. Starting at the lowest step and working upward prevents fresh concrete from pushing against already-placed material. Consolidate each lift with a vibrator or by rodding to eliminate air pockets.
-
Strike off and float each tread. Use a bull float or hand darby to bring the surface to a flat, even plane. Do not over-work the surface at this stage. Excessive floating pulls water to the top and weakens the finish layer.
-
Wait for the “Golden Window.” This is the most critical timing decision in the entire process. The Golden Window for broom finishing can shift by 30–45 minutes depending on temperature and humidity. The surface is ready when the bleed water has evaporated and the concrete no longer feels spongy underfoot. Press your thumb lightly into the surface. You want a 3–4mm impression, not a deep gouge.
-
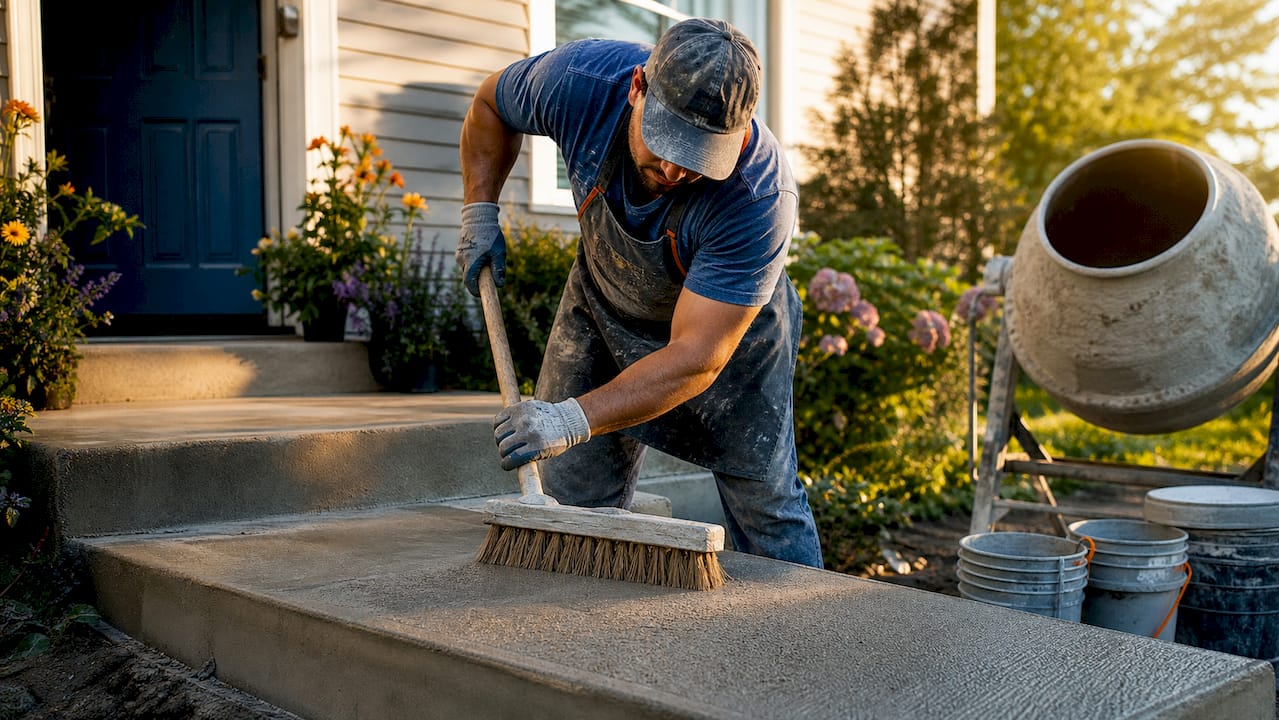
Apply the broom finish in one consistent direction, perpendicular to foot traffic. Use steady, even pressure across the full width of each tread. Lift the broom cleanly at the end of each pass. Overlapping strokes or inconsistent pressure creates an uneven texture that looks unprofessional and wears unevenly.
-
Round every nosing edge with an edging tool. Sharp 90-degree corners chip under freeze-thaw pressure. A rounded nosing takes less than a minute per step and dramatically extends the life of the edge.
Pro Tip: On hot, dry Melbourne days, the Golden Window can close in under 20 minutes. On cool, overcast days, you may have an hour. Watch the surface, not the clock. Assign one person to monitor conditions while another manages the pour.
Brushed vs. other driveway step finishes: which is right for you?
Choosing a finish is a design and function decision. Each option has a specific use case, and understanding the tradeoffs saves you from expensive regret.
Brushed finish is the most cost-effective choice for steps that need consistent grip under both foot and vehicle traffic. The texture is uniform, easy to clean, and holds up well without sealing. It suits most residential driveway step designs and pairs naturally with a plain or colored concrete driveway surface.
Exposed aggregate delivers a higher-end look by embedding decorative stones into the surface. It offers excellent grip and is a popular choice for decorative concrete finishes on premium residential projects. The tradeoff is higher installation cost and more demanding cleaning requirements, since debris collects between the stones.
Stamped concrete driveway steps replicate the look of slate, brick, or stone using textured mats pressed into fresh concrete. They are the most visually striking option but carry the highest cost and require periodic resealing to maintain color and surface integrity. Stamped surfaces can also become slippery when the sealer wears down, which is a real safety concern on steps.
Smooth finish is the least suitable option for any outdoor step. It looks clean in photos but becomes dangerously slick when wet.
| Finish Type | Slip Resistance | Cost | Maintenance | Best Use Case |
|---|---|---|---|---|
| Brushed | High | Low | Minimal | All-purpose driveway steps |
| Exposed aggregate | High | Medium-High | Moderate | Decorative residential entries |
| Stamped concrete | Medium (varies) | High | High (resealing) | Feature steps, low-traffic areas |
| Smooth | Low | Low | Low | Indoor slabs only |
- Brushed finish suits high-traffic, all-weather driveway steps in most Melbourne climates.
- Exposed aggregate works well when the driveway itself uses the same finish for visual continuity.
- Stamped concrete is best reserved for low-traffic decorative steps where aesthetics outweigh safety concerns.
- Smooth finish should never be used on outdoor steps.
Pro Tip: In Melbourne’s climate, where summer heat and occasional frost both stress concrete, brushed finish with an air-entrained mix is the most reliable combination. Save decorative finishes for sheltered or low-traffic areas where the maintenance commitment is manageable.
How do you maintain brushed concrete steps long-term?
Proper curing is the first maintenance task, and it starts the moment the broom leaves the surface. Concrete steps need a minimum of 7 days of curing for initial stability and a full 28 days to reach design strength. Keep the surface moist during this period using curing compound or plastic sheeting. Do not allow foot traffic during the first 7 days.
After curing, a penetrating concrete sealer applied before the first winter protects against moisture ingress and deicing salt damage. Salt is particularly destructive because it accelerates the freeze-thaw cycle at the surface level, causing scaling and spalling within a single season.
Routine maintenance for brushed concrete steps is straightforward:
- Sweep steps weekly to remove grit and debris that abrades the surface texture over time.
- Wash with a garden hose or low-pressure washer monthly. Avoid high-pressure washing, which erodes the brushed texture.
- Inspect nosing edges each spring for chips or cracks. Small chips can be repaired with a concrete patching compound if caught early.
- Reseal every 3–5 years depending on traffic volume and weather exposure.
- Call a professional if you notice surface scaling larger than a coin, deep cracks, or step movement. These are signs of sub-base failure, not surface issues.
The crushed rock base beneath your steps does most of the structural work. If you see cracking patterns that radiate from a single point, the problem is almost always below the surface, and patching the top will not fix it.
Key takeaways
A brushed concrete finish is the most reliable, cost-effective, and safe choice for driveway steps when the sub-base is properly compacted, the mix is correctly specified, and the broom is applied at exactly the right time.
| Point | Details |
|---|---|
| Sub-base is non-negotiable | Compact MOT Type 1 in layers to prevent settlement and cracking. |
| Use air-entrained concrete | Air entrainment protects steps from freeze-thaw damage in variable climates. |
| Master the Golden Window | Monitor surface conditions on-site; timing shifts 30–45 minutes with temperature and humidity. |
| Round every nosing edge | Sharp corners chip under freeze-thaw pressure; a nosing edger takes minutes and saves years. |
| Cure before you use | Wait 7 days for foot traffic and 28 days for full strength before heavy use. |
What i’ve learned after years of finishing concrete steps
The homeowners who get the best results are the ones who respect the groundwork. Every project I have seen fail in the first two years traced back to a rushed or under-compacted sub-base, not a bad finish. The surface gets all the attention, but it is just the top layer of a system.
Timing the broom finish is the skill that separates a good result from a great one. I have worked in Melbourne summers where the window closed in 15 minutes and cool autumn days where I had nearly an hour. No article or schedule can replace standing next to the slab and reading it. That is why I always tell homeowners considering DIY to at minimum have an experienced eye on site during the finishing stage.
On the design side, I see a lot of homeowners reach for stamped or exposed aggregate finishes on steps because they look impressive in photos. My honest view is that brushed finish ages better, costs less to maintain, and performs more consistently in real conditions. Save the decorative options for areas where you can control the environment. On a driveway step that gets wet, icy, and dirty, function wins every time.
Proactive maintenance is the other habit that separates a 10-year step from a 30-year one. A $30 tube of patching compound applied to a small chip in spring costs nothing compared to a full step replacement two winters later.
— Vic
Get expert results on your driveway steps with VW concreting
Getting a brushed concrete finish right requires more than good technique. It requires the right equipment, the right mix, and years of experience reading concrete in real conditions.

VW Concreting has completed over 145 projects across Melbourne since 2001, including driveways and concrete slabs that combine structural integrity with quality surface finishes. Whether you are planning new driveway steps, a full driveway replacement, or a renovation that includes decorative options, the team brings the tools and experience to deliver results that last. Contact VW Concreting today for a consultation or quote on your next project.
FAQ
What is a brushed concrete finish on driveway steps?
A brushed concrete finish is created by dragging a stiff-bristled broom across fresh concrete before it fully sets, producing a textured surface. This texture increases slip resistance by up to 50% compared to a smooth finish, making it the standard choice for outdoor steps.
How long do brushed concrete driveway steps take to cure?
Concrete steps reach initial stability after 7 days and full design strength after 28 days. Avoid foot traffic during the first week and heavy loads until the full cure is complete.
Are brushed concrete steps better than stamped concrete steps?
Brushed finish outperforms stamped concrete on safety and maintenance for high-traffic driveway steps. Stamped surfaces can become slippery as the sealer wears, while brushed texture remains grippy without resealing.
How do i prevent the edges of my concrete steps from chipping?
Round every nosing edge with a nosing edger tool immediately after broom finishing. Sharp 90-degree corners are the leading cause of early edge failure under freeze-thaw pressure.
How often should i seal brushed concrete driveway steps?
Apply a penetrating sealer before the first winter after installation, then reseal every 3–5 years depending on traffic and weather exposure. Sealing protects against moisture ingress and deicing salt damage.
Leave A Comment